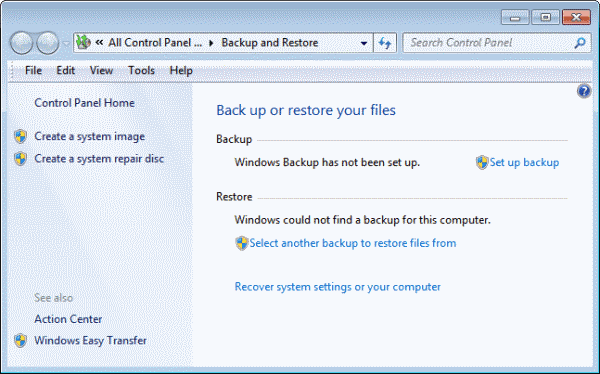
To begin the process of creating your system backup image, click on “start” and in the search field, type in the word “backup”. Now you should see under the programs section of the search results a program called “backup and restore”. Click on this and it will open up the utility you need to begin creating a system image.

On the left hand side of the screen, there will be a link entitled “create a system image”, so click on that and you’ll be taken to a screen where you’ll get to choose where you want to save your system image. Now – a system image means backing up every file and folder on your computer, so you need to choose a location that is big enough for the task. Usually a removable USB hard drive is a good choice, but if you want you can also back up to multiple DVDs or to a network location if you have multiple computers linked up over a network.
Click on “next” and you then get to choose which drive you want to back up. You can use this utility to backup any drive connected to your system, but in this case we want to choose the “C:” drive, which is where your Windows 7 operating system is, and all your program files. Again, you’ll be shown how much space is being used up on your C: drive, so you need to check to make sure you have enough space on your external drive to save the image. If you’re using DVDs, each DVD can hold only 4.7GB of information, so they usually aren’t suitable for this task, but you have the option anyway. Naturally, you won’t be able to back up onto the same drive as your windows 7 installation, as the whole point of this is to protect against a hard drive failure, and if your backup is on the same drive as your operating system, you’d lose that too.
Once you have selected all the options and you’re happy, click on “start backup” to begin. The time it takes to complete the backup will depend on how much data you have stored.
Once your backup is done, the next step is to create a repair disk. This will allow you to boot up your computer should Windows 7 not work. You do this from the main “backup and restore” page we were at before, but this time click on “create a system repair disk” on the left. All you need do is insert a black CD or DVD, and click “create disk”. Keep this disk in a safe place, as if you have any problems with your computer, you may need it to restore your data.

No comments:
Post a Comment